In this post I am going to cover part of the new Flash Pro/Flash Builder feature that we implemented in the recent release of Adobe Flash Authoring (Adobe Flash CS5).I am going to start with the entry points to create your Flash Professional Project.
From Adobe Flash Builder 4 :
1. Launch Adobe Flash Builder.
2. Right click on package Explorer and select "Flash Professional Project" as follows :
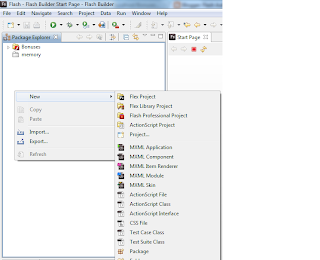
3. Select New > Flash Professional Project and you should get prompted with the following dialog :
4. Click on the browse button and select a target Fla file. Remember each Flash Professional Project has to be have a target Fla file. As you see in the above dialog, the default location on where your project is going to get created is Flash Builder workspace. Of course, you can un-check the default location and point to any location you want. For now we are going to keep it as is.
5. Click "Finish".
6.Now,If Flash Professional was not launched.Creating the project is going to launch Flash Professional and publish without opening the Fla file in Flash.
7. Once you create a Flash Professional Project a three icons for (Publish,Debug,and Test Movie) get enabled as follows :
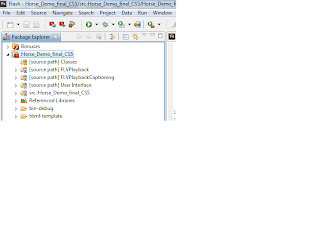
And also all your Fla file settings get copied over to Flash builder at the time of the creation of your project such as (library Path,source path,etc..). For instance, if you have a custom SWC that you added to your Library path of your Fla, that SWC will get copied over to Flash Builder when you create your project and you can code against it in Flash Builder.
Note : the Fla file settings get copied over to Flash Builder only at the time of the creation of your project which means that if you add a swc to your Fla file, your Flash Professional Project settings in Flash Builder won't sync. You can see your Flash Professional Settings by :
1. Right Click on your Flash Professional Project in Flash Builder
2. Select "Properties".
3. Click on "ActionScript Build Path" category.
As you see all the Fla settings have been copied over.
From here you can "Test Movie" using "Ctrl + Enter" for windows Or " Command + Enter for Mac. You can also Publish and Debug from within Flash Builder.
In the part2 of this post, i am going to cover how to creating a Flash Professional Project from Flash Professional and talk about preferences.
enjoy!
Thursday, May 27, 2010
Monday, May 10, 2010
Using Flash Builder 4 with Flash CS5
Watch my session from Flash camp San Francisco. In this session i covered the new workflow between Flash Pro and Flash Builder 4 that we have implemented in Flash CS5.
USING FLASH BUILDER 4 WITH FLASH CS5
Enjoy!
USING FLASH BUILDER 4 WITH FLASH CS5
Enjoy!
Bookmark this post:blogger tutorials
Social Bookmarking Blogger Widget |
Thursday, May 6, 2010
Code hints is unable to build code hints cache
One of the new cool features in Adobe Flash Authoring CS5 is custom code hints introspection. Using this feature some of you might encounter the bug when code hints is unable to build code hints cache. A file cap was put in place to prevent the code hinting mechanism from churning in the background for files saved on the desktop or in the root directory. It will try to parse all surroundings files which could take quite a bit of time and would hold up getting back any code hinting information. Therefore, a default file cap of 800 files was put into place. However, you can change this value by adding a preference key as follows :
This tip is only for advance users who are comfortable changing registry keys.
Windows:
1. Open Regedit and navigate to: HKEY_CURRENT_USER > Software > Adobe > Flash 11 > Settings
2. Right+click and choose: ‘New… > DWORD Value’
3. Rename the key: Project File Cap
4. Select the key and choose: ‘Modify’
5. Edit the value as either hex or decimal: 1000
6. Click OK and restart Flash
Mac:
1. Open ‘/Users//Library/Preferences/Flash CS5 Preferences’ in Text Edit
2. Under the section add the following: 1000
3. Save the file and restart Flash
Thanks,
tareq
Windows:
1. Open Regedit and navigate to: HKEY_CURRENT_USER > Software > Adobe > Flash 11 > Settings
2. Right+click and choose: ‘New… > DWORD Value’
3. Rename the key: Project File Cap
4. Select the key and choose: ‘Modify’
5. Edit the value as either hex or decimal: 1000
6. Click OK and restart Flash
Mac:
1. Open ‘/Users/
2. Under the
3. Save the file and restart Flash
Thanks,
tareq
Bookmark this post:blogger tutorials
Social Bookmarking Blogger Widget |
Subscribe to:
Posts (Atom)