Check out the new physics engine that is going to be in Flash CS5.
Very cool stuff, no code required to create a very complicated physics motion and apply it to symbol on stage.
http://www.youtube.com/watch?v=l09eJw-hN78&feature=autoshare_twitter
Enjoy!
Wednesday, October 7, 2009
Adobe Max 2009 Sneak Peaks - Physic objects
Bookmark this post:blogger tutorials
Social Bookmarking Blogger Widget |
Monday, October 5, 2009
Flash Applications for the iPhone
Adobe announced today at MAX that it is next version of Flash, Adobe Flash CS5 ,is going to enable users to easily create and develop applications for iPhone and iPod touch.
The work-flow to build those applications using Adobe Flash CS5 is going to be straight forward and not complicated at all so anyone can build an app.
Check out some of those applications
http://labs.adobe.com/technologies/flashcs5/appsfor_iphone/
The work-flow to build those applications using Adobe Flash CS5 is going to be straight forward and not complicated at all so anyone can build an app.
Check out some of those applications
http://labs.adobe.com/technologies/flashcs5/appsfor_iphone/
Bookmark this post:blogger tutorials
Social Bookmarking Blogger Widget |
Wednesday, June 3, 2009
Flash Outline View
I know many of the Flash Builder(formerly Flex Builder) users will say"Wait!! there is no Outline view in Flash. Where did you come up with this stuff?". My answer would be, ohhh! i meant to say Movie Explorer panel.
Flash CS4 is a product rich of features, but many users only know about a small subset of its capabilities. Movie Explorer is one of those features that I am going to talk about in this post.
To open the Movie Explorer panel you can just go
Window > Movie Explorer or "Alt + F3."
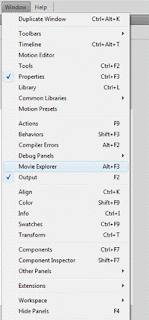
Let's go over the Movie Explorer UI and explain how it works:
1. Launch Flash CS4.
2. First thing you want to do is to open Movie Explorer (Window > Movie Explorer) and dock it anywhere in the UI where you can see it at all time. I usually dock it on top of the action panel as follows :
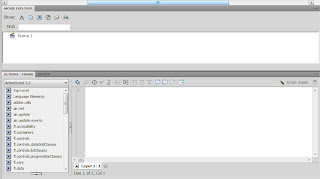
Movie explorer has 6 buttons that filters different items in your Flash Movie as follows :
 To show text items.
 To show symbols (Movieclips,Buttons,Graphic).
 To show actionscript code on the main timeline and inside symbols.
 To show (video, sounds, and bitmaps).
 To show layers and the content of each layer categorized by frames.
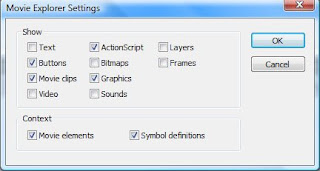
And also you can customize the settings of your Movie Explorer panel by clicking on

Which should present you with
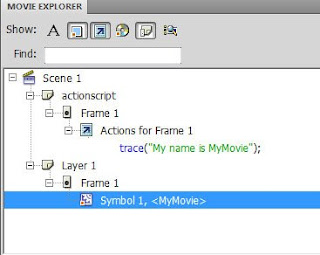
Let's assume that you have a Fla file that has the following
1. Instance of a movieclip called "MyMovie".
2. Layer 2 that called "actionscript" and has trace statement on frame 1
Please make sure to press the Actionscript, Movieclip, and Layers buttons in the Movie Explorer and you should see :
Check out the below link to see more information about Movie Explorer
Adobe Flash Movie Explorer
You can save your current workspace by
"Window > Workspace > New Workspace" and just give it a name.
Enjoy it!
Tareq
Flash CS4 is a product rich of features, but many users only know about a small subset of its capabilities. Movie Explorer is one of those features that I am going to talk about in this post.
To open the Movie Explorer panel you can just go
Window > Movie Explorer or "Alt + F3."

Let's go over the Movie Explorer UI and explain how it works:
1. Launch Flash CS4.
2. First thing you want to do is to open Movie Explorer (Window > Movie Explorer) and dock it anywhere in the UI where you can see it at all time. I usually dock it on top of the action panel as follows :

Movie explorer has 6 buttons that filters different items in your Flash Movie as follows :
 To show text items.
 To show symbols (Movieclips,Buttons,Graphic).
 To show actionscript code on the main timeline and inside symbols.
 To show (video, sounds, and bitmaps).
 To show layers and the content of each layer categorized by frames.
And also you can customize the settings of your Movie Explorer panel by clicking on

Which should present you with

Let's assume that you have a Fla file that has the following
1. Instance of a movieclip called "MyMovie".
2. Layer 2 that called "actionscript" and has trace statement on frame 1
Please make sure to press the Actionscript, Movieclip, and Layers buttons in the Movie Explorer and you should see :

Check out the below link to see more information about Movie Explorer
Adobe Flash Movie Explorer
You can save your current workspace by
"Window > Workspace > New Workspace" and just give it a name.
Enjoy it!
Tareq
Bookmark this post:blogger tutorials
Social Bookmarking Blogger Widget |
Wednesday, May 13, 2009
Adobe Flash CS4 Professional Update (10.0.2) is live on adobe.com
The Flash team has been working tirelessly on Flash updater that fixes many performance problems and some other few bugs.
You can download the Updater (Adobe Flash CS4 Professional Update 10.0.2) from the following location
http://www.adobe.com/downloads/updates/
You can also visit
http://www.adobe.com/devnet/flash/
OR
http://www.adobe.com/devnet/
To run the updater please do the following :
1.Quit Adobe Flash CS4.
2.Download and install the updater from the above location.
For more about this update visit Richard Galvan's blog.
Cheers
Tareq
Bookmark this post:blogger tutorials
Social Bookmarking Blogger Widget |
Tuesday, March 31, 2009
Did you know????
In this post am going to tell you few tips that are not known by many Flash users ,except for a few.SHSHSH.... please don't tell anyone :).
Tip 1 : New Sprite Icon in Flash CS4: Sprite has unique green icon that distinguish it from Movie clips symbol.Don't get excited, it is still a Movie clip since it has a timeline in it, it is just a different icon.
Many Users would rather use Sprite over Movie Clip because of the overhead in memory required to instantiate a Movie clip once the timeline is being used.
Now let me show you the new Icon :
1. New Fla file.
2. Create a rectangle on stage.
3. Using the selection tool Double click on the rectangle to select.
4. Modify > Convert To Symbol.
5. Turn on "Export for ActionScript" as follow :
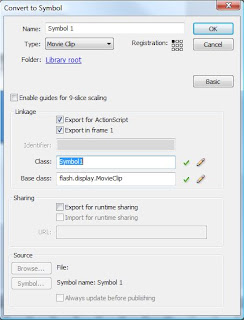
6.Change the Base class value from "flash.display.MovieClip" to "flash.display.Sprite".
7.Click OK.
8.Click OK again.
9.(Window > Library) to open Library panel if it is not already and you should see the following :
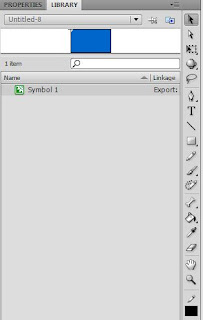
Tip 2 : Do you know that you can assign an instance name to an animation in the Motion Property inspector, then use this line of code—tweenInstanceName.addTarget (mcInstanceName)—to apply this animation to another instance in your FLA file as follow :
1. Launch Flash CS4.
2. New Flash File(ActionScript 3.0).
3. Using the Rectangle tool create a rectangle on stage.
4. Select the rectangle on stage and convert to Movie clip.
5. Right Click on the Movie clip on stage and select "Create Motion Tween" as follow :
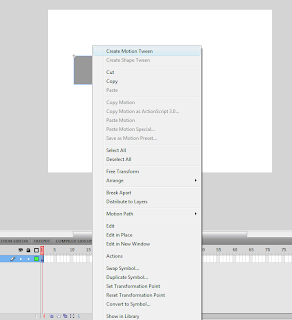
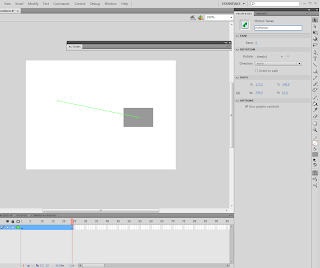
6.Change the location of the Movie clip on stage to animate it and by doing that you should see the animation path as follow :
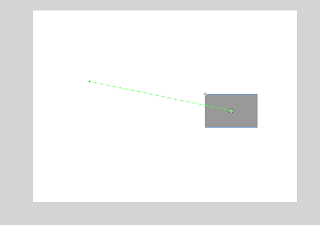
7. Select the animation path and open the Properties panel (Windows > Properties).
8. Add an instance name to the Motion by typing an instance name for Motion Tween as follow :
9. Create a new timeline layer.
10.On the new layer create another Movieclip and give it an instance name "newMovie".
11.Create new layer and call it "Actions" and open the action panel (Windows > Actions)
12. In the action panel type the following :
//myMotion is the motion instance name
//myMovie is the target Movie clip
//tweenInstanceName.addTarget (mcInstanceName)
myMotion.addTarget(newMovie);
13. Test Movie and you should see both Movie clips has the same animation.
Tip 3: New Flex component Icon in Flash CS4: Flex Components that was built in Flash CS4 has unique Flex icon that distinguish it from Flash Movie clips.
1. Quit Flash CS4.
2. Download and install Flex Component Kit for Flash CS3 Professional using Adobe Extension Manager CS4.
Note : it is saying Flex Component Kit for Flash CS3 but it also works for Flash CS4 "promise am telling you the truth".
3. Launch Adobe Flash CS4.
4. File > New and select "Flash File(ActionScript 3.0) and click OK.
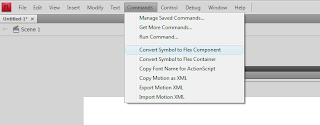
5. Open the Commands menu and it should look like this if the kit was installed correctly :
6.Using the Rectangle tool create a rectangle on stage.
7.Select the rectangle on stage and convert to Movieclip.
8.Commands > Convert Symbol To Flex Component.
9.Windows > Library to open Library if it is not already and you should see the new pretty icon as follow :
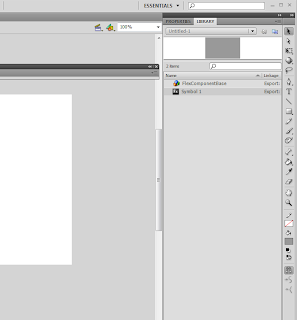
How about that :), pretty cool.
Now you can publish and use this symbol in Flex. I will be talking about this in future posts.
Thanks,
Tareq
Tip 1 : New Sprite Icon in Flash CS4: Sprite has unique green icon that distinguish it from Movie clips symbol.Don't get excited, it is still a Movie clip since it has a timeline in it, it is just a different icon.
Many Users would rather use Sprite over Movie Clip because of the overhead in memory required to instantiate a Movie clip once the timeline is being used.
Now let me show you the new Icon :
1. New Fla file.
2. Create a rectangle on stage.
3. Using the selection tool
 Double click on the rectangle to select.
4. Modify > Convert To Symbol.
5. Turn on "Export for ActionScript" as follow :

6.Change the Base class value from "flash.display.MovieClip" to "flash.display.Sprite".
7.Click OK.
8.Click OK again.
9.(Window > Library) to open Library panel if it is not already and you should see the following :
Tip 2 : Do you know that you can assign an instance name to an animation in the Motion Property inspector, then use this line of code—tweenInstanceName.addTarget (mcInstanceName)—to apply this animation to another instance in your FLA file as follow :
1. Launch Flash CS4.
2. New Flash File(ActionScript 3.0).
3. Using the Rectangle tool create a rectangle on stage.
4. Select the rectangle on stage and convert to Movie clip.
5. Right Click on the Movie clip on stage and select "Create Motion Tween" as follow :

6.Change the location of the Movie clip on stage to animate it and by doing that you should see the animation path as follow :

7. Select the animation path and open the Properties panel (Windows > Properties).
8. Add an instance name to the Motion by typing an instance name for Motion Tween as follow :

9. Create a new timeline layer.
10.On the new layer create another Movieclip and give it an instance name "newMovie".
11.Create new layer and call it "Actions" and open the action panel (Windows > Actions)
12. In the action panel type the following :
//myMotion is the motion instance name
//myMovie is the target Movie clip
//tweenInstanceName.addTarget (mcInstanceName)
myMotion.addTarget(newMovie);
13. Test Movie and you should see both Movie clips has the same animation.
Tip 3: New Flex component Icon in Flash CS4: Flex Components that was built in Flash CS4 has unique Flex icon that distinguish it from Flash Movie clips.
1. Quit Flash CS4.
2. Download and install Flex Component Kit for Flash CS3 Professional using Adobe Extension Manager CS4.
Note : it is saying Flex Component Kit for Flash CS3 but it also works for Flash CS4 "promise am telling you the truth".
3. Launch Adobe Flash CS4.
4. File > New and select "Flash File(ActionScript 3.0) and click OK.
5. Open the Commands menu and it should look like this if the kit was installed correctly :

6.Using the Rectangle tool create a rectangle on stage.
7.Select the rectangle on stage and convert to Movieclip.
8.Commands > Convert Symbol To Flex Component.
9.Windows > Library to open Library if it is not already and you should see the new pretty icon as follow :
How about that :), pretty cool.
Now you can publish and use this symbol in Flex. I will be talking about this in future posts.
Thanks,
Tareq
Bookmark this post:blogger tutorials
Social Bookmarking Blogger Widget |
Wednesday, March 4, 2009
Slice 9 in Adobe Flash CS4
Lately I have been getting many questions and complains regarding Slice 9 and why it's not functioning correctly when doing certain things , so i decided to write this blog to clarify two things :
- What is Slice 9 and how the user can you use it.
- Feature Limitations.
First let me talk a little bit about Slice 9 concept and then i will tell you about what you can and cannot do with slice 9.
The concept of Slice 9 is to split the Movieclip into 9 areas that are going to be scaled independently.
Why?? Using the Slice 9 grid,Users can control which areas to be scaled and which not to be scaled.For instance, many designers don't want see the corners of a custom component to be distorted when scaling that component.
As you see in the graph below Flash Authoring will divide the Movieclip into 9 areas that going to be scaled as below
1. No scale 2. Horizontal scale 3. No scale
4. Vertical scale 5. Horizontal and Vertical scale 6. Vertical scale
7. No scale 8. Horizontal scale 9. No scale
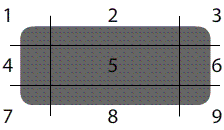
Figure 1. Slice 9 areas.
Nothing better than an example to demonstrate how to use scale 9
1. Launch Flash CS4 "if you don't have Flash CS4 go buy it :)".
2. File > New and then Select "Flash File (ActionScript 3.0).
3. Select Rectangle Tool from the ToolBar as follow :
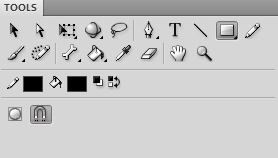
Figure 2. ToolBar Panel.
4. From Properties panel (Window > Properties).Under Rectangle Options lock the rectangle corner and set them to 15 as follow
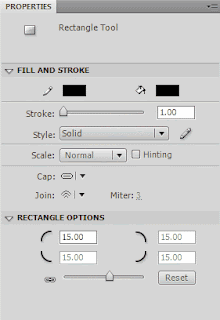
Figure 3. Properties Panel.
5. Draw Rectangle on Stage.
6. Select the Rectangle and the stroke by double clicking on it.
7. Modify > Convert To Symbol.
8. Make sure Symbol type is MovieClip.
9. Turn on "Enable guides for 9-slice scaling" as follow :
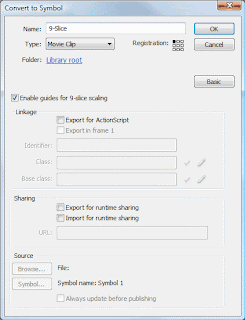
Figure 4. Convert To Symbol dialog.
10.Click OK.
11.Double click on the symbol to go into Edit mode and you should be seeing the following :
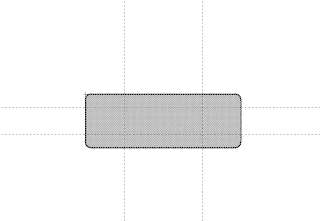
Figure 5. Slice 9 Edit Mode.
Moving those guides will determine which areas are going to be scaled :
a. Horizontally
b. Vertically
c. No Scale
as i explained above "Figure 1".
12.Exit "Edit Mode" by clicking on Scene 1 as follow :

Figure 6. Exit Edit Mode.
13. Now try to scale the rectangle as follow :
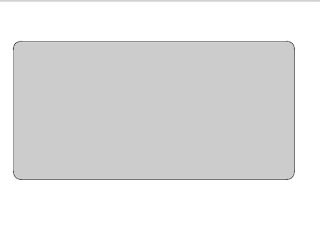
Figure 7. MovieClip with Slice 9.
Notice that neither the stroke nor the corners have been scaled.
Now let's try to turn off Slice 9 and see the difference. You can turn off Slice 9 by doing the following :
1. Right click on the Symbol inside the library and select "Properties".
2. Turn off "Enable guides for 9-slice scaling".
3.Click Ok.
You will see that the Rectangle on stage looks like below :
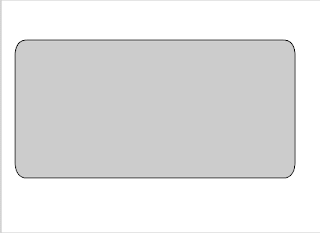
Figure 8. MovieClip without Slice 9.
Slice 9 limitations :
1. You can apply Slice 9 only on a MovieClip ( No Shape , No Button).
2. You can only Scale Slice 9 horizontally or vertically and if you try the following type of transformation,Slice 9 will get automatically turned off :
a. Skew.
b. Rotate.
- What is Slice 9 and how the user can you use it.
- Feature Limitations.
First let me talk a little bit about Slice 9 concept and then i will tell you about what you can and cannot do with slice 9.
The concept of Slice 9 is to split the Movieclip into 9 areas that are going to be scaled independently.
Why?? Using the Slice 9 grid,Users can control which areas to be scaled and which not to be scaled.For instance, many designers don't want see the corners of a custom component to be distorted when scaling that component.
As you see in the graph below Flash Authoring will divide the Movieclip into 9 areas that going to be scaled as below
1. No scale 2. Horizontal scale 3. No scale
4. Vertical scale 5. Horizontal and Vertical scale 6. Vertical scale
7. No scale 8. Horizontal scale 9. No scale

Figure 1. Slice 9 areas.
Nothing better than an example to demonstrate how to use scale 9
1. Launch Flash CS4 "if you don't have Flash CS4 go buy it :)".
2. File > New and then Select "Flash File (ActionScript 3.0).
3. Select Rectangle Tool from the ToolBar as follow :

Figure 2. ToolBar Panel.
4. From Properties panel (Window > Properties).Under Rectangle Options lock the rectangle corner and set them to 15 as follow

Figure 3. Properties Panel.
5. Draw Rectangle on Stage.
6. Select the Rectangle and the stroke by double clicking on it.
7. Modify > Convert To Symbol.
8. Make sure Symbol type is MovieClip.
9. Turn on "Enable guides for 9-slice scaling" as follow :

Figure 4. Convert To Symbol dialog.
10.Click OK.
11.Double click on the symbol to go into Edit mode and you should be seeing the following :

Figure 5. Slice 9 Edit Mode.
Moving those guides will determine which areas are going to be scaled :
a. Horizontally
b. Vertically
c. No Scale
as i explained above "Figure 1".
12.Exit "Edit Mode" by clicking on Scene 1 as follow :

Figure 6. Exit Edit Mode.
13. Now try to scale the rectangle as follow :

Figure 7. MovieClip with Slice 9.
Notice that neither the stroke nor the corners have been scaled.
Now let's try to turn off Slice 9 and see the difference. You can turn off Slice 9 by doing the following :
1. Right click on the Symbol inside the library and select "Properties".
2. Turn off "Enable guides for 9-slice scaling".
3.Click Ok.
You will see that the Rectangle on stage looks like below :

Figure 8. MovieClip without Slice 9.
Slice 9 limitations :
1. You can apply Slice 9 only on a MovieClip ( No Shape , No Button).
2. You can only Scale Slice 9 horizontally or vertically and if you try the following type of transformation,Slice 9 will get automatically turned off :
a. Skew.
b. Rotate.
Bookmark this post:blogger tutorials
Social Bookmarking Blogger Widget |
Monday, February 23, 2009
Using StringUtil Class in Flash
Using Flex ActionScript 3.0 classes in Flash is now easier than ever before due to the new addition of the Flash Library path and external library path.
Am going to demonstrate how users can use StringUtil class without the need to go through the hoops to make it work in Flash.
1. Launch Flex Builder.
2. Create "Flex Library Project" and call it "FlexUtilFlash".
3. Right Click on the "src" folder and create "ActionScript Class" and call it "FlexUtilFlash.as".
4. Copy and paste the following code to the class
package
{
import mx.utils.StringUtil;
public class FlexUtilFlash
{
public function FlexUtilFlash()
{
new StringUtil();
}
}
}
In the above class all what am doing is instantiating StringUtil class and include it into my SWC that am going to use in Flash.
5. Save.
Note : FlexUtilFlash.swc file automatically created and saved in the bin directory of the project file after saving the FlexUtilFlash.as file as below :

6. Launch Flash CS4 Professional.
7. Choose File > New > Flash File (ActionScript 3.0).
8. Choose File > Save and name the file FlashFlexUtil.fla. The location of the saved Flash file is unimportant, so you can save it in any folder you like.
9. Choose File > Publish Settings to access the Publish Settings dialog box.
10. Click the Flash tab to see the Flash Player and ActionScript settings.
11. Click the Settings button next to the ActionScript drop-down menu.
12. Click the Library Path tab.
13. Click the red SWC icon and browse to select the SWC file named FlexUtilFlash.swc that was generated by Flex in Step 5. After you select the FlexUtilFlash.swc file, the path to the file is added to the Library path window as below :
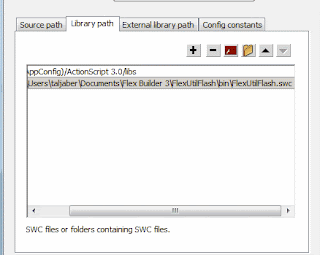
14. Open the Actions panel by choosing Window > Actions. Since the FlashFlexUtil.fla file contains only one layer, Frame 1 of Layer 1 is automatically selected. Copy and paste the following code into the Script window to instantiate an object of FlashFlexUtil:
import mx.utils.StringUtil;
var str:String = " This is Awesome!!!";
trace(str);
var sttTrim:String = StringUtil.trim(str);
trace(sttTrim);
15.Test Movie and you should see the result should be as below :

As you see above, adding the SWC allow you to use all the StringUtil class methods and properties in Flash.
Am going to demonstrate how users can use StringUtil class without the need to go through the hoops to make it work in Flash.
1. Launch Flex Builder.
2. Create "Flex Library Project" and call it "FlexUtilFlash".
3. Right Click on the "src" folder and create "ActionScript Class" and call it "FlexUtilFlash.as".
4. Copy and paste the following code to the class
package
{
import mx.utils.StringUtil;
public class FlexUtilFlash
{
public function FlexUtilFlash()
{
new StringUtil();
}
}
}
In the above class all what am doing is instantiating StringUtil class and include it into my SWC that am going to use in Flash.
5. Save.
Note : FlexUtilFlash.swc file automatically created and saved in the bin directory of the project file after saving the FlexUtilFlash.as file as below :

6. Launch Flash CS4 Professional.
7. Choose File > New > Flash File (ActionScript 3.0).
8. Choose File > Save and name the file FlashFlexUtil.fla. The location of the saved Flash file is unimportant, so you can save it in any folder you like.
9. Choose File > Publish Settings to access the Publish Settings dialog box.
10. Click the Flash tab to see the Flash Player and ActionScript settings.
11. Click the Settings button next to the ActionScript drop-down menu.
12. Click the Library Path tab.
13. Click the red SWC icon and browse to select the SWC file named FlexUtilFlash.swc that was generated by Flex in Step 5. After you select the FlexUtilFlash.swc file, the path to the file is added to the Library path window as below :

14. Open the Actions panel by choosing Window > Actions. Since the FlashFlexUtil.fla file contains only one layer, Frame 1 of Layer 1 is automatically selected. Copy and paste the following code into the Script window to instantiate an object of FlashFlexUtil:
import mx.utils.StringUtil;
var str:String = " This is Awesome!!!";
trace(str);
var sttTrim:String = StringUtil.trim(str);
trace(sttTrim);
15.Test Movie and you should see the result should be as below :

As you see above, adding the SWC allow you to use all the StringUtil class methods and properties in Flash.
Bookmark this post:blogger tutorials
Social Bookmarking Blogger Widget |
Subscribe to:
Comments (Atom)
